Active@ Disk Image
Active@ Disk Image is an ultimate solution that allows you to create an exact image of the data stored in selected partitions of a hard disk or an image of the entire hard disk. You can protect your valuable data by regularly making a disk image and keeping it in a safe place. If you have trouble with data corruption, or if you want to refer to an archived version of a file, you can easily restore the data.
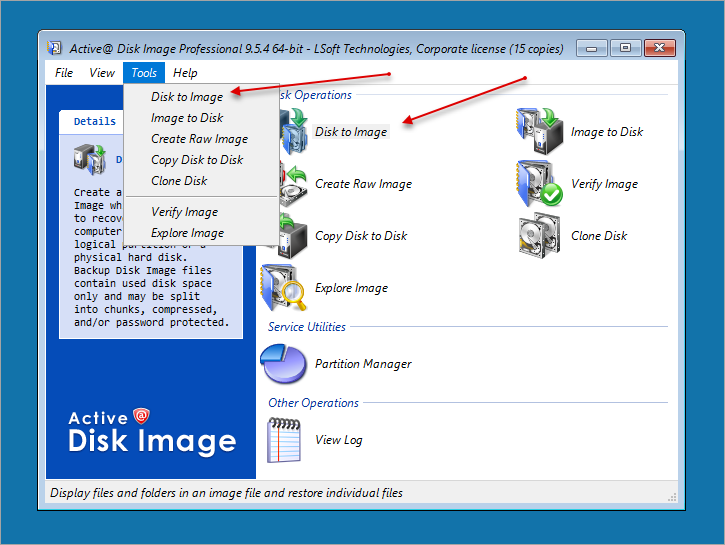
The application provides many tools when it comes to backing up data on your hard disk:
- Disk to Image
- Choosing this option will open the Disk to Image Wizard. It will help you in creating a regular type of the disk image archive of an entire disk or of selected partitions in the system
- Image to Disk
- This option features Image to Disk Wizard which will enable you to restore data from a disk image archive that you have previously created
- Explore Image
- Enables you to browse through files and folders in a disk image as though it was a hard drive. You can select folders or individual files and restore them
- Verify Image
- Verify Image Wizard is there to checking the integrity of the disk image archive file
- Create Raw Image
- With its Create Raw Image Wizard this application will guide you in creating a raw type disk image of only one partition or the entire disk
- Clone Disk
- Enables you in transfering a sector-by-sector copy from one disk (partition) to another
- Partition Manager
- A tool that helps you create, delete, format or show properties of partitions on all devices in your system
Creating a Disk or Partition Image
The Disk to Image Wizard steps you through the process of creating a disk image for a whole disk or a number of partitions.
To create a disk or partition image:
- To open Active@ Disk Image in the Active@ Boot Disk shell click .
- To open the Disk to Image Wizard (in the Disk Operations Panel) choose Disk to Image:
- The wizard will ask you to choose one from three available backup types:
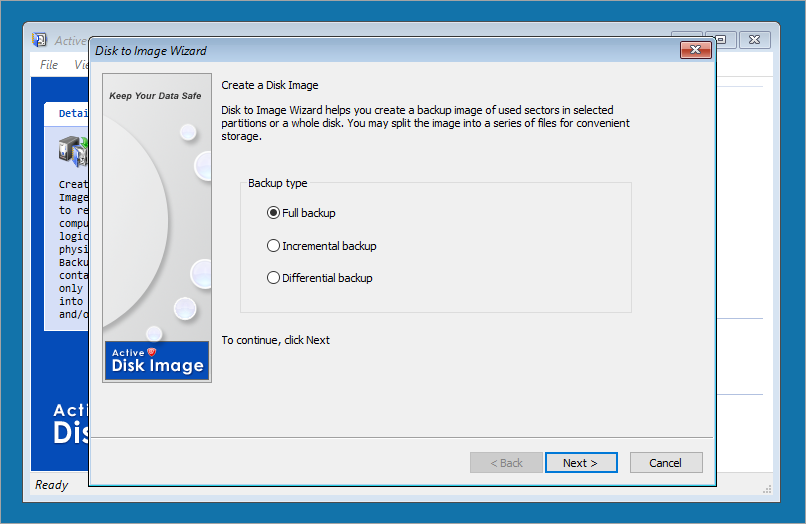
- Full Backup
- Represents an ordinary backup. If this is your first backup it doesn’t matter which option you choose, the first backup is always Full Backup.
- Incremental Backup
- It’s made out of Full Backup and other incremental backups. It contains differences and changes between these two backups, and the main characteristic of the Incremental Backup is that it doesn’t require a lot of space but it does require the information from all of the previous incremental backups in order to be functional
- Differential Backup
- Requires only the first (Full Backup) and the last backup. There is no difference between Incremental and Differential backups if they only have two backups (Full Backup+ another backup), the difference becomes noticeable over longer periods of time when Incremental backup generates more of its backups.
- Click Next to open Select Disks and Partitions window:
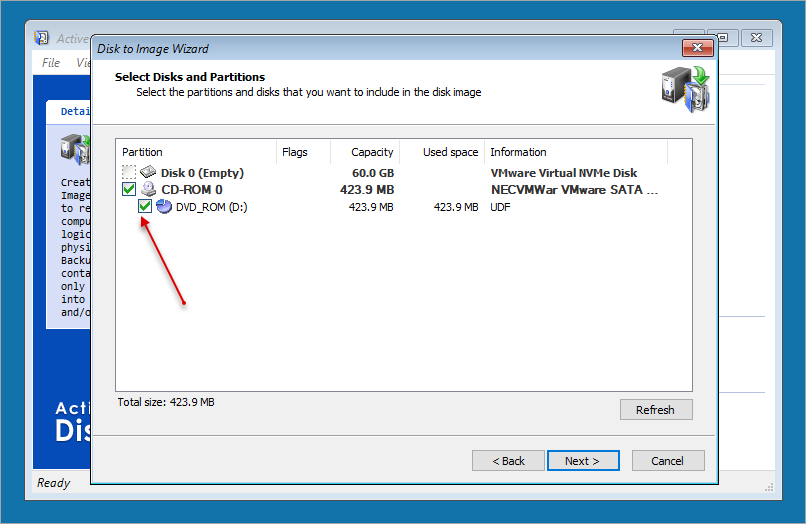
- Select a check box next to a disk or partition that you want to be included in the disk image. You can see at the bottom of the list the total size for the selected partitions being displayed.
- Click Next and the Indicate Backup Location page will appear:
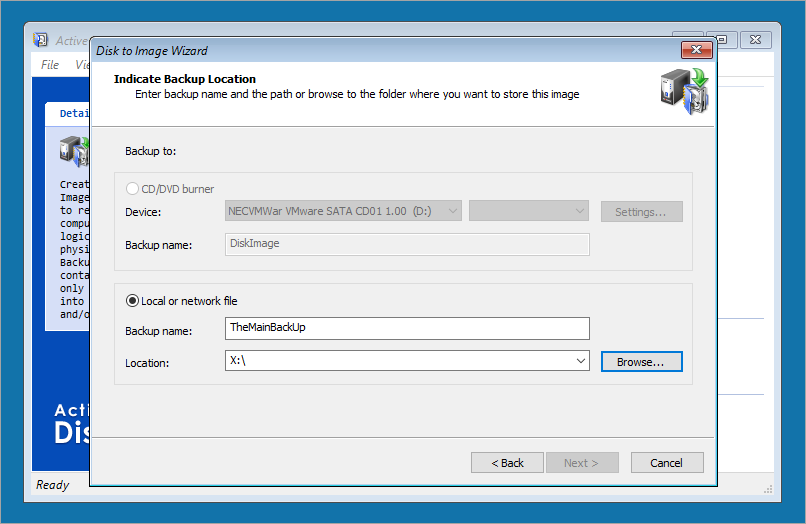
- Do the following:
- If a CD/DVD burner is available, select the CD/DVD radio button, select a device from the Device drop-down list and type an appropriate disk image name into the Backup name field.
- To save the disk image to a hard disk, select the Local or network file radio button and click Browse... and navigate to the location where you want to save the disk image.
- Click Next. The Image Options page appears:
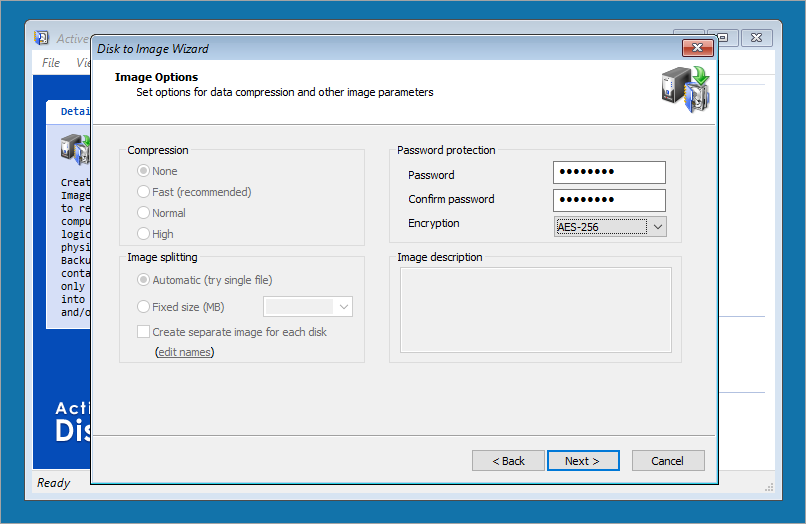
- Do the following:
- To set the compression ratio, select one of the three options:
- None give you fast results and a larger file size.
- Normal (recommended) is a compromise between a smaller file size and a faster operation speed.
- High provides the smallest file size and takes the longest time to complete.
- To try saving the disk image to a single file, in the Image Splitting area, select the Automatic (try single file) option. If the system runs out of free disk space on the disk where you are saving the backup - or if you are storing an image file on disk with a FAT file system - Active@ Disk Image automatically will split the archive into multiple files and prompt you to add another path in order to continue writing the rest of the file.
- To manually indicate how to split the disk image, in the Image Splitting area, select the Fixed size (MB) option and type a file size in megabytes or choose a size from the drop-down list.
- To protect sensitive data on a disk image, in Password field type a password (maximum 16 characters) and type the same password in Confirm field.
- Optionally, type a short description of your disk image (maximum 1,024 characters) into the Image description text box.
- Click Next, which will take you to Create Another window. Active@
Disk Image also supports creating of multiple image files simultaneously:
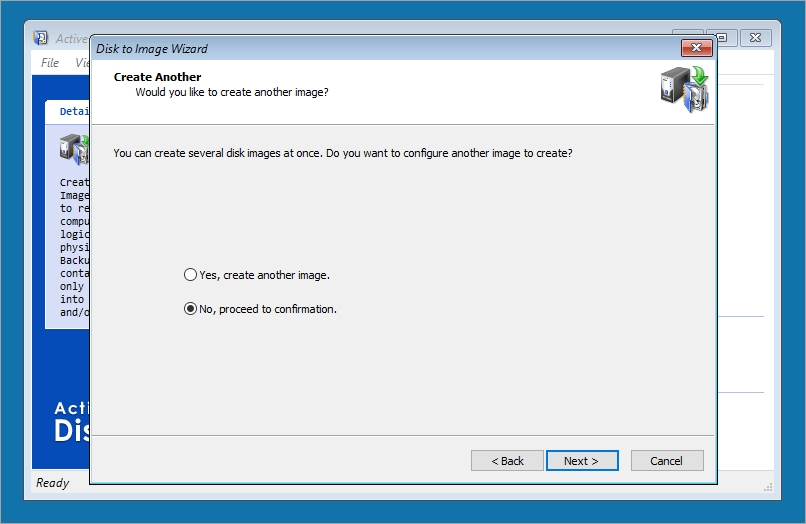
- To create an additional image file check Yes, create another image. This will open another wizard where you will need to choose the settings (select Backup type, choose drive and partitions, etc ) for this image file from the beginning.
- In order to create Raw image check Yes, create another Raw image. New wizard will start asking you pick the drive you want backup in Raw Image format. Later you will need to choose Backup location, set Image options etc. Basically, you will need to repeat previously explained steps (5-8)
- If you do not want to create any additional images you just click Next, since No, Proceed to confirmation is selected by default.
- After clicking on Next the Confirm Operation Details page will show up:
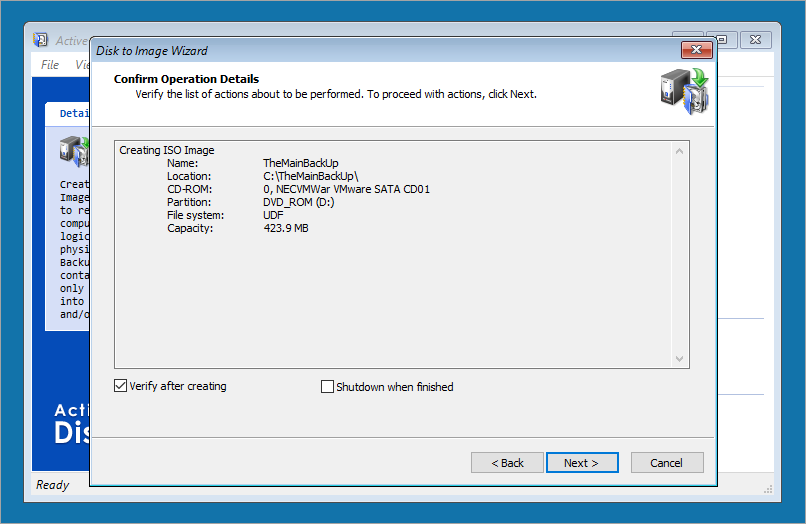
- Do the following:
- Review the details in the summary.
- Verify after creating is checked by default.
- Shut down when finished - choose this option if you plan to create an image during the night or while you are away
- Minimize in tray - checking this will minimize Active@ Disk Image in system tray, freeing your Taskbar and Desktop
- By clicking on Next you will initialize the image file creation and open the Progress
Status page:
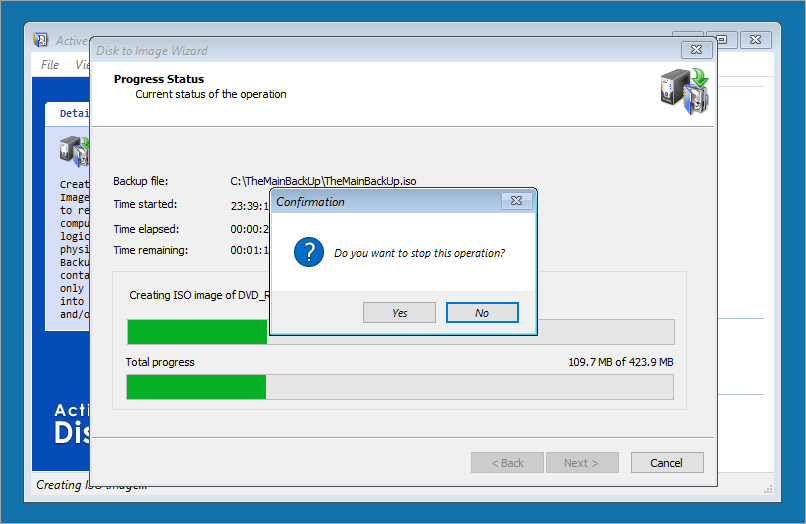
To stop the operation at any time, click Cancel.