How to load Active@ Boot Disk over the network via PXE environment on a Windows 10 computer?
There are several steps required to do this: configuring the WinPE WIM, Boot Manager and PXE Server.
For the configuration steps, let's assume that inserted Active@ Boot Disk has a F: letter in our configuration environment.
Step 1: Copy WinPE Source Files onto the PXE Server
- Map a network connection to the root TFTP directory on the PXE/TFTP server and create a \Boot folder there. We will assign this network drive the Y: letter.
- You can the ‘Easy access’ feature in the Windows Explorer to do this:

- Copy WinPE Source Files onto the PXE Server
- Make sure to enable read/write permissions in the sharing and folder options Copy the PXE boot files from the mounted \Boot folder of the Active@ Boot Disk boot.wim to the \Boot folder on PXE/TFTP server.
For example:
copy C:\mount\windows\boot\pxe\*.* y:\boot- To mount/dismount the boot.wim file, see section “How to place a registered Active@ Boot Disk product…”
- After dismounting the wim, copy the bootable Windows PE image (F:\ Sources\Boot.wim) to the \Boot folder on PXE/TFTP server
- Copy the file boot.sdi (F:\ Boot\boot.sdi) to the \Boot folder on PXE/TFTP server
Step 2: Configure boot configuration
- On a Windows 10 computer or in a Windows PE environment, create a BCD store using the BCDEdit tool
- In the BCD store, configure the RAMDISK, BOOTMGR and OSLoader settings for the Windows PE image
- Copy the BCD file to the \Boot folder on PXE/TFTP server
- Configure your PXE/TFTP server and DHCP server to point PXE clients to download PXEBoot.com or PXEBoot.n12
These are a few of the files that were copied over to the server in Step 1
For more details, see “Creating a BCD file for PXE boot”
Step 3: Deployment process
Boot the client machine through PXE, connected to the network. After pressing initializing the PXE boot, the system should handle the rest. Here’s what will happen:
- The client is directed (by using DHCP Options or the PXE Server response) to download PXEBoot.com
- PXEBoot.com downloads Bootmgr.exe and the BCD store. The BCD store must reside in a \Boot directory in the TFTP root folder. Additionally, the BCD store must be called BCD
- Bootmgr.exe reads the BCD operating system entries and downloads Boot.sdi and the Windows PE image
- Bootmgr.exe begins booting Windows PE by running Winload.exe within the Windows PE image
For more detailed instructions, read the Microsoft TechNet official documentation.
Configuring a PXE Server
Configuring a TFTP server is made simple with a tool called Serva.
This tool is an “Automated PXE Server Solution Accelerator” that supports a variety of server protocols. The ones we will be configuring are TFTP and DHCP.
- Click the logo in the top left to access the Settings
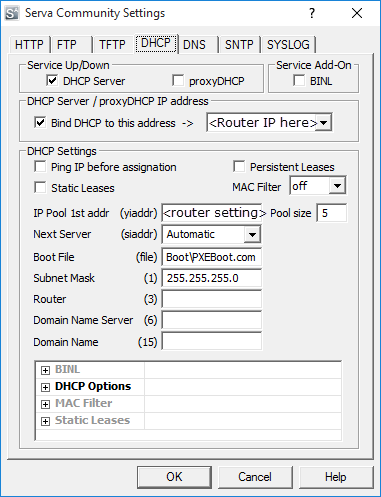
- Configure your DHCP settings. You may copy the ones below, just make sure the address it binds to is a static IP address from your router. Under IP Pool 1st addr, input the first available IP address in your routers IP pool settings.

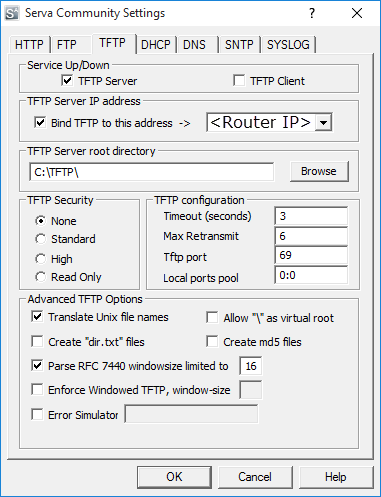
- Configure your TFTP settings. You may also copy the setting below. Again, make sure the IP address is your router’s static IP and the TFTP server root directory is the one you configured in Step 1.

Once the settings are configured, reset the application and your PXE server should be fully operational!
Creating a BCD file for PXE boot:
This entire process is done in Windows Command Prompt. Be sure to run it as administrator.
- Create a BCD store using bcdedit.exe:
bcdedit /createstore c:\BCD- Configure RAMDISK settings:
bcdedit /store c:\BCD /create {ramdiskoptions} /d "Ramdisk options"
bcdedit /store c:\BCD /set {ramdiskoptions} ramdisksdidevice boot
bcdedit /store c:\BCD /set {ramdiskoptions} ramdisksdipath \boot\boot.sdi
bcdedit /store c:\BCD /create /d "winpe boot image" /application osloader
The last command will return a GUID, for example:
The entry { bb254249-93e9-11e7-84cb-6c71d9da760e } was successfully created.
Copy this GUID for use in the next set of commands. In each command shown, replace "GUID1" with your GUID.
- Create a new boot application entry for the Windows PE image:
bcdedit /store c:\BCD /set {bb254249-93e9-11e7-84cb-6c71d9da760e} device ramdisk=[boot]\Boot\boot.wim,{ramdiskoptions}
bcdedit /store c:\BCD /set {bb254249-93e9-11e7-84cb-6c71d9da760e} path \windows\system32\winload.exe
bcdedit /store c:\BCD /set {bb254249-93e9-11e7-84cb-6c71d9da760e} osdevice ramdisk=[boot]\Boot\boot.wim,{ramdiskoptions}
bcdedit /store c:\BCD /set {bb254249-93e9-11e7-84cb-6c71d9da760e} systemroot \windows
bcdedit /store c:\BCD /set {bb254249-93e9-11e7-84cb-6c71d9da760e} detecthal Yes
bcdedit /store c:\BCD /set {bb254249-93e9-11e7-84cb-6c71d9da760e} winpe Yes
- Configure BOOTMGR settings (remember to replace GUID1 in the third command with your GUID):
bcdedit /store c:\BCD /create {bootmgr} /d "boot manager"
bcdedit /store c:\BCD /set {bootmgr} timeout 30
bcdedit /store c:\BCD -displayorder {bb254249-93e9-11e7-84cb-6c71d9da760e} -addlast
- Copy the BCD file to your TFTP server:
copy c:\BCD \\PXE-1\TFTP\Boot\BCD
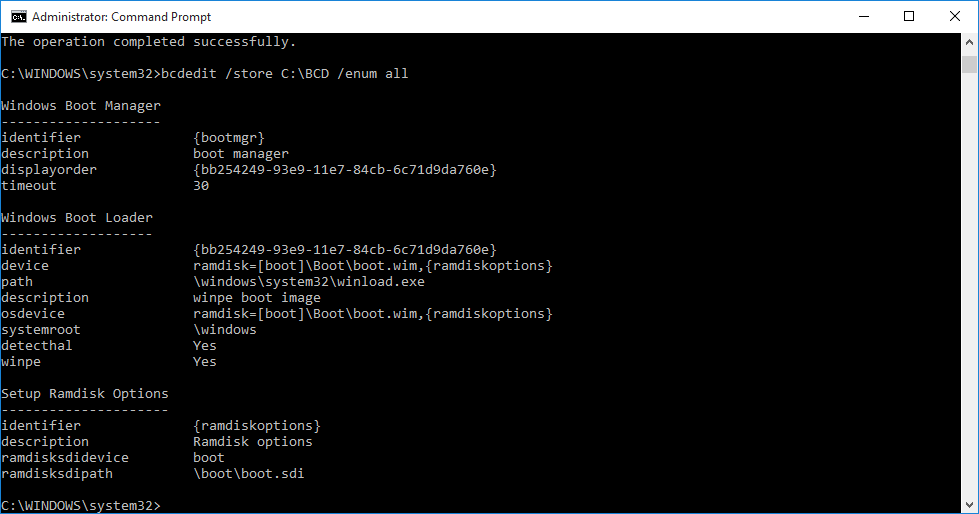
Your PXE/TFTP server is now configured. You can view the BCD settings that have been configured using the command:
bcdedit /store < BCD file location > /enum all.
See the following example.
Note: Your GUID will be different than the one shown below.
C:\>bcdedit /store C:\BCD /enum all

